04 May 2015

How to take screenshot in Apple Watch

How to take screenshot in Apple Watch

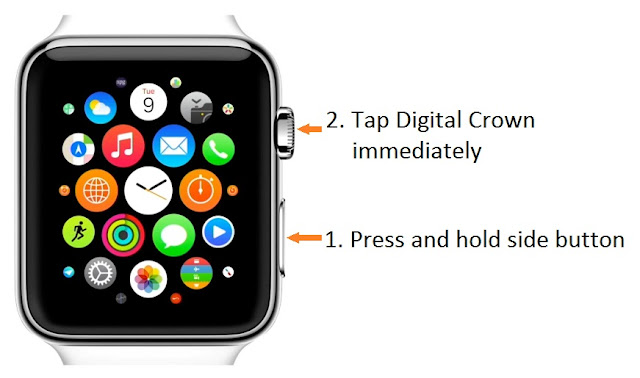
To take a screenshot on iPhone or iPad is extremely straightforward and so simple. You should simply press the Home and Power button in the same time. However do you know how to take screenshot on an Apple Watch. Apple watch also has screenshot feature it is also a simple method as like iPad and iPhone, but since there is no Home button, you must utilize the Digital Crown.

Method to take screenshot on Apple Watch

Here's the way to do it:

  1. First go to your screen which you like to capture.
  2. Press and hold the button on side of the Apple Watch and tap the Digital Crown immediately.
  3. The screen will give a flash with camera shutter sound.
To see the screenshot you captured, open the iPhone's Photos app. This app will allow you to edit, delete and share the photo to your friends.

27 March 2015

How to take screenshot in Windows phone 8.1


Windows Phone 8 is one of the finest mobile operating system from Microsoft, which is gaining popularity now. Windows Phone 8 is the second significant variant of Microsoft's operating system, which is followed by Windows Phone 7. Windows Phone 8's One of the new feature is the capability to take screenshots. Windows phone users can easily take screenshots with ease.

how to take Windows phone 8.1 screenshot

Let's see

How to take screenshot in Windows Phone 8.1 and 8.

Windows Phone 8.1

  • Navigate to the place where you take screenshot.
  • Press and hold Power and Volume up button at the same time. Phone will make a snap with a flashing effect.
  • Screenshot image will be saved in Pictures > Screenshot folder in .png file extension. (wp_ss_20150315_0001.png)
Note: If using microSD card check the screenshot folder in SD card. Otherwise locate it in phone.
See the settings in Storage sense.

Windows Phone 8

  • Simply press and hold Windows and Power button at the same time. 
  • Screenshot can be viewed in Photo App > Album > Screenshot.

Why this screenshot button changed in Windows 8 and 8.1?

Windows Phone 8 devices usually have Windows home hardware button. But the some recently launched Windows Phone devices comes with Windows home onscreen software button. To facilitate this screenshot feature in Windows phone, Microsoft made this change.

27 February 2015

How to convert Images or scanned PDF into docx, xlsx or txt files

Today, I am going to tell you a easiest method which drastically reduces your precious time on typing larger contents or notes form books. This trick is valuable when you need to type some contents from books or some other hard copy. There is a easier method which converts screenshots, images (jpeg, png, gif, bmp, tiff, pdf and DjVu), scanned PDF files into editable Office word-docx, excel-xlsx and text-txt files which allows you to easily copy the converted contents into your document. In certain cases pdf files may have watermarks which may cause inconvenience while submitting your report. This trick will permit you to take out the watermark from the document.

Requirements

  • You ought to have dynamic web association. (Be that as it may you can download different apparatuses on the off chance that you need to work disconnected from the net)
  • Hardcopy or softcopy of the record which you need to duplicate.
  • In the event that you have hardcopy you require a scanner or cam to change over it into picture.

Prerequisite

  • You should have active internet connection. (However you can download other tools if you want to work offline)
  • Hardcopy or softcopy of the document which you want to copy.
  • In case you have hardcopy you need a scanner or camera to convert it into image.

Convert scanned images into Office Word file

This conversion basically works on the OCR (Optical Character Recognition) Technology.
Optical character recognition (OCR) is the mechanical or electronic conversion of images of typewritten or printed text into machine-encoded text. - Wikipedia

Simple procedure to convert images into Office Word file.


  1. Crop the image section which you like to convert (verify the image quality is adequate to read the content)
  2. Open onlineocr.net or newocr.com website the online conversion tool.
  3. Upload the image file and fill the Captcha and click on convert button.

I discovered two limitations in this conversion tool.

  • It only accepts to upload upto 5 Mb size of image or PDF files to be converted.
  • In some cases if the text on uploading picture is not clear the converted output texts will not be correct.

Note:

www.newocr.com has some liberal norms it permits you to Convert JPEG, PNG, GIF, BMP, TIFF, PDF, Djvu into Text However it doesn't have any upload file size limit. Also it has other options as described above.

25 November 2014

Play Youtube videos in finer slow or faster playback speed

The online Youtube video player has playback speed option to choose, you can easily change the video playback speed. Youtube allows you to watch a video in slow playback speed and watch the more frames details or, even you can increase the playback speed to watch the video in faster motion rate in case you feel that the video is boring and fly through the video by 2x playback speed.

You can play Youtube video in slow motion or increased playback speed.

If you don't see the playback speed changing option in your Youtube video player, you are likely utilizing the default Flash based video player. To use the speed changing option on Youtube video player go to youtube.com/html5 and pick the HTML5 Youtube player.

Watch Youtube video in Slow-Motion or Fast-Motion

In case the Youtube still didn't show the option to control the playback speed for a specific video, or in case that you wish to have better control over the speed, you can simply utilize the great old VLC Player to watch any video on Youtube (or Vimeo) with finer control on speed in either slow motion or fast motion.

See also: Watch YouTube Playlists with VLC

Here's procedure to take control of Youtube speed control in VLC player.

  • Now copy the Youtube video URL
  • Open the VLC player and select Media -> Open Network Stream and paste the copied Youtube video URL box.
  • Click on play button.
  • Now VLC will start streaming the Youtube video.
  • To control the video playback speed in VLC media player.
  • On the VLC menu bar go to Playback -> speed now click above the line on top of faster.

Now the Playback menu alone stays above the video streaming to finer control of video playback speed for both slow and faster modes.


Advantage of using VLC over Youtube

Youtube player only allows you to choose video speeds of .25x, .5x, 1.5x or 2x. whereas VLC video player has even more finer control on speed. you can choose slower (fine) or faster (fine) for miltiple times to reduce and increase the video speed in between .25x to 4x of the normal playing speed.

Enjoy! Valga valamudan

05 November 2014

Restrict Facebook friend’s request who cannot be rejected

We come across many person everyday in travel, coaching class, interview and etc. On a fine day if he sends you a friend request on Facebook. What will you do? You have some couple of conversation with him, he appears to be a truly decent person yet at the same time you don’t know him well enough to approve his friend request.

How would you manage these unwanted friend requests on Facebook coming from office associates or old colleagues who are acquaintances yet not so much friends?

When you get a friend request from somebody who you don't like to be friends with, you can either graciously reject the request or ignore it and the request will show up as pending in their timeline. Then again when you have no alternative yet to approve favor that request, you can click "Confirm" to add that person to your Facebook friends yet there is a option to put him or her in your Restricted list.

When you place somebody in the Restricted list, they will be listed and displayed as your friend on Facebook however they'll just see your photographs and different posts that are published as public. However, they can just see your contents which you shared to public followers. The only difference is listed as friend with you.


To place somebody in the Restricted List, go to their Facebook profile, pick the "Add to List" option from the Friends drop-down and select Restricted. From this instant they can only access to your public content in their Facebook newsfeed.

Enjoy! Valga valamudan

24 October 2014

How to enable Offline mode in Google Chrome

Whenever you open any webpage in Google Chrome, it associate with the Internet, gets the most recent form of the webpage from the server and presentations it on your screen. In case that your machine is disconnected from the internet, Chrome will show a lapse message with a dinosaur picture saying it is not able to connect with the Internet.

Internet Explorer and Firefox gives you offline mode that automatically saves a copy of website pages as you surf in the Internet and shows this local copy when you are disconnected from the Internet. Therefore, in case that you are disconnected from the internet in a flight, you can even now open and read websites that you got to while your machine was on the internet.

Setting offline browsing in Google Chrome

The latest version of Google Chrome additionally included features like offline browsing however the option to enable the cache variant of any site page is concealed hidden inside the settings.

Enable the offline mode in Google Chrome.

  1. Open Google Chrome.
  2. On the address and search bar type chrome://flags/ it will show a warning message " Careful, these experiments may bite".
  3. Now search for “Enable Offline Load Stale Button” option. Hit the "Default" option and change to "Enable".
  4. The browser asks to click on "Relaunch Now". Now the browser will restart.

Presently in case that you are disconnected from the internet, your Chrome browser will provide for you an alternative to load the "stale copy" if the page you are attempting to get to is accessible in the local cache reserve (see screenshot).


Google Chrome stores the HTML contents, pictures, JavaScript and the CSS templates connected with a page so your offline copy ought not look altogether different from the original. Anyhow, if there are assets that require a dynamic Internet connection, in the same way as JavaScript widgets or videos, they'll not be loaded instead shows a placeholder pictures.

To test the feature, open your favorite webpage inside Chrome, turn off your Wi-Fi or disconnect the Ethernet link, and reload the website in the browser. In case that the offline mode is enabled, the reserved cache variant would appear on your screen.

Note:
  • The offline mode option is only available from the Chrome v36. If you are using older version then update it to the latest version.
  • Dinosaur image (Tyrannosaurus rex or T-rex) appears when the JavaScript or videos doesn't load or cached. The image probably says that the little arms could not reach the internet.
Enjoy! Valga Valamudan

07 August 2014

How to install Google Analytics tracking code on your website

Google Analytics is the best website activity tracking instrument recognized by all webmasters. Not like other website tracking tools, Google Analytics gives you far detailed report of traffic and gives the result with analyzing features with goal implementation and test capability. which other web analytic tool lacks. The interesting thing is Google gives the extensive analytics for free as like other Google services. You can use Google Analytics for each of your websites.

Why to install Google Analytics to your website.

Google Analytics gives you the detailed report from where your visitors are coming from, Which sites referring you, What content mostly viewed, how long the visitors stayed on your site, How many visitors returning to your site, Search engines traffic to your site, Search keywords to your site, OS used by visitors, Screen size of visitors, browser used by visitors and tons of packed features to analyze your website. Google Analytics filters the bots views and gives the real human clicks and page views on your website. So the advertising networks usually ask the Google analytics page views and unique visitors to your website for approvals.

How to install Google Analytics code to your website.

1. Login to Google Analytics with your Google account.
2. Click Admin on main menu.
3. Hit the property dropdown and select Create Property.

install Google Analytics tracking code on your website

4. Click on Website and enter Website name, Website URL, Industry Category and Reporting Time Zone.
Get Google Analytics tracking code

5. Now hit on Get Tracking ID button.
Add Google Analytics tracking code on your website

Adding Google Analytics Web Property ID to Blogger.

1. Login to blogger and go to your blog.
2. Now navigate to Settings -> other.
3. Scroll down and locate Google Analytics. Now paste your Analytics Web Property ID.

add Google Analytics tracking code on blogger

4. Now click save.

Adding Analytics Web Property Code on Tumblr

1. Login to Tumblr.
2. Select your blog.
3. Click on Settings Icon.

Install Google Analytics tracking code on tumblr

4. Scroll down and hit on Edit theme.
How to install Google Analytics tracking code on tumblr

5. Scroll down on Edit theme on left side and locate Google Analytics ID
6. Enter your Google Analytics Tracking ID.

Add Google Analytics tracking code on tumblr

7. Now click Save.

Adding Google Analytics Web Property Code on Wordpress or on custom sites.

Go to header.php on your theme on Wordpress blog, on custom sites locate header closing tag.
Copy and paste the tracking code script directly before </head> tag.
(Google recommends to place the code before </head> tag)

<!-- Google analytics starts -->
<script>
  (function(i,s,o,g,r,a,m){i['GoogleAnalyticsObject']=r;i[r]=i[r]||function(){
  (i[r].q=i[r].q||[]).push(arguments)},i[r].l=1*new Date();a=s.createElement(o),
  m=s.getElementsByTagName(o)[0];a.async=1;a.src=g;m.parentNode.insertBefore(a,m)
  })(window,document,'script','//www.google-analytics.com/analytics.js','ga');

  ga('create', 'UA-5XXXXXXX-1', 'auto');
  ga('send', 'pageview');

</script>
<!-- Google analytics ends -->

</head>

After successful installation of Google Analytics Tracking Code, Google Analytics will show Tracking Status as Receiving Data after few hours.

Enjoy! Valga Valamudan
26 July 2014

How to embed Twitter tweet on Wordpress blog

Twitter is a service for expressing individual views or ideas in short messages, normally called "tweets", between users. You can also add your site to Twitter in many ways.

Wordpress has made easy to embed Twitter tweets on Wordpress blog just enter the twitter tweet url Wordpress will do the script works for you.

Also see: How to embed Youtube video in Wordpress blog

How to embed Twitter posts on Wordpress blog

1. Choose your tweet you want to embed on wordpress blog.

2. Click on the time stamp on tweet and copy the link from browser address or right click over the time stamp on the tweet and copy the URL link.

embed Twitter tweet on Wordpress blog

3. Go to your Wordpress blog editor and paste the tweet URL link. Make sure it is not hyperlinked.
https://twitter.com/crounji/status/490887986293137408

That's it. To ensure click on Wordpress preview and find the changes.

How to embed Twitter tweet on Wordpress blog

Tips and tricks on embedding tweet in Wordpress blog

Using shortcode technique
[tweet https://twitter.com/crounji/status/482197005934923776]

Align tweet left, center and right
[tweet 482197005934923776 align='center']

Shortcode with width control
[tweet https://twitter.com/crounji/status/482197005934923776 width='200']

Display tweets reply in different languages
[tweet https://twitter.com/crounji/status/482197005934923776 lang='en']

Short tweet code
[tweet 482197005934923776]

Short tweet code to hide thread
[tweet 482197005934923776 hide_thread='true']

Short tweet code to hide media
[tweet 482197005934923776 hide_media='true']

Combination of tweet shortcode
[tweet 482197005934923776 hide_thread='true' width='250' lang='ko']

Happy to see your experiance in comment section.

Valga valamudan

20 July 2014

How to add horizontal Featured Posts in Blogger

Hai Blogger companions, Today i have a blogger cool stuff. It's about indicating horizontal Featured posts with thumbnail from any specific label/category in blogger. As you can see the screenshot of featured post below. You simply need to add some basic script to your blogger template. You can discover some default gadgets in blogger, but there is no option for featured posts. So in this post, I will show the most beautiful method to display the featured posts with thumbnail in blogger.
add horizontal Featured Posts in Blogger

How to add horizontal featured posts in blogger

1. Login to your Blogger dashboard.
2. go to layout.
3. Add a new HTML/JavaScript gadget above the blog posts.
4. Copy and paste the below code on HTML/JavaScript gadget.
<center><div id='bp_recent'></div><div class='bp_footer'>
<script style='text/javascript'>
//Featured Posts Script by crounji.org
var postTitleOriginal,  myLink, myDiv, myImage,mySeparator;
var    main;
var float_clear=false;
var flag = 0;
function bprecentpostswiththumbnails(json) {
for (var i = 0; i < numberOfPosts; i++) {
if (i == json.feed.entry.length) break;
var s;
    var entry = json.feed.entry[i];
    var postTitle = entry.title.$t;
    postTitleOriginal = postTitle;
    if (isNaN(titleLength) || titleLength == 0) {
        postTitle = '';
    }
    else if (postTitle.length > titleLength) postTitle = postTitle.substring(0, titleLength) + "...";
    var postUrl="";
    for (var k = 0; k < entry.link.length; k++) {
        if (entry.link[k].rel == 'replies' && entry.link[k].type == 'text/html') {
            var commentText = entry.link[k].title;
            var commentUrl = entry.link[k].href;
        }
        if (entry.link[k].rel == 'alternate') {
            postUrl = entry.link[k].href;
            break;
        }
    }
    if (showThumbs == true) {
        var thumbUrl = "";
        try {
            thumbUrl = entry.media$thumbnail.url;
            thumbUrl = thumbUrl.replace("/s72-c/","/s"+imgDim+"-c/");
        } catch (error) {
            if ("content" in entry) s = entry.content.$t; else s="";
            if (thumbUrl == "" && mediaThumbsOnly == false) {
                 regex = /http\:\/\/www\.youtube(-nocookie){0,1}\.com\/(v){0,1}(embed){0,1}\/(([^"&?' ]*))/;
                videoIds = s.match(regex);
                if (videoIds != null) {
                    videoId = videoIds[4];
                }
                if (videoIds != null && videoId != null) thumbUrl = "http://img.youtube.com/vi/" + videoId + "/2.jpg"
            }
            if (thumbUrl == "" && mediaThumbsOnly == false) {
                a = s.indexOf("<img");
                b = s.indexOf("src=\"", a);
                c = s.indexOf("\"", b + 5);
                d = s.substr(b + 5, c - b - 5);
                if ((a != -1) && (b != -1) && (c != -1) && (d != "")) thumbUrl = d;
            }
        }
        if(thumbUrl.indexOf("static.flickr.com")!=-1) {thumbUrl= thumbUrl.replace("_b_t.jpg","_s.jpg");thumbUrl= thumbUrl.replace("_m_t.jpg","_s.jpg");thumbUrl= thumbUrl.replace("_s_t.jpg","_s.jpg");
        thumbUrl= thumbUrl.replace("_b.jpg","_s.jpg");thumbUrl= thumbUrl.replace("_m.jpg","_s.jpg");}
        if (thumbUrl == "" && showNoImage == true)
        {
        thumbUrl = "http://1.bp.blogspot.com/-cKZwVnjcVHI/U8uXCGwnxCI/AAAAAAAAIgw/kcJx2jyY3dc/s1600/default.png";
        try{if(defaultImage!="") thumbUrl=defaultImage;}catch(error){}
        thumbUrl = thumbUrl.replace("/s72-c/","/s"+imgDim+"-c/");
        }
    }
    if (showPostDate == true) {
        var postdate = entry.published.$t;
        var cdyear = postdate.substring(0, 4);
        var cdmonth = postdate.substring(5, 7);
        var cdday = postdate.substring(8, 10);
        var monthnames = new Array();
        monthnames[1] = "Jan";
        monthnames[2] = "Feb";
        monthnames[3] = "Mar";
        monthnames[4] = "Apr";
        monthnames[5] = "May";
        monthnames[6] = "Jun";
        monthnames[7] = "Jul";
        monthnames[8] = "Aug";
        monthnames[9] = "Sep";
        monthnames[10] = "Oct";
        monthnames[11] = "Nov";
        monthnames[12] = "Dec";
    }
    code = "";
        main = document.getElementById('bp_recent');
        myDiv = document.createElement('div');
        myDiv.setAttribute("class", "bp_item_title");
        myLink = createLink(postUrl,"_top",postTitleOriginal)
        if(main.innerHTML!=""){
        mySeparator = createDiv("bp_recent_separator");
        main.appendChild(mySeparator)
        }
        if(postTitle != ''){myDiv.appendChild(myLink);}
        main.appendChild(myDiv);if(postTitle != '')myLink.innerHTML = postTitle;

    if (showThumbs == true && thumbUrl != "") {
        myImage = document.createElement('img');
        myImage.setAttribute("src", thumbUrl);
        if(imgFloat!="none")
        {
        float_clear=true;
        myImage.style.cssFloat=imgFloat;
        myImage.style.styleFloat=imgFloat;
        }
      try{if(myMargin!=0)myImage.style.margin = myMargin+"px";} catch(error){}
        myImage.setAttribute("alt", postTitleOriginal);
        myImage.setAttribute("width", imgDim);
        myImage.setAttribute("height", imgDim);
        myLink = document.createElement('a');
        myLink.setAttribute("href", postUrl+"?utm_source=bp_recent&utm-medium=gadget&utm_campaign=bp_recent");
        myLink.setAttribute("target", "_top");
        myLink.setAttribute("title", postTitleOriginal);
        myLink.appendChild(myImage);
        myDiv = document.createElement('div');
        myDiv.setAttribute("class", "bp_item_thumb");
        myDiv.appendChild(myLink);
        main.appendChild(myDiv);
    }
 try {
        if ("content" in entry) {
            var postContent = entry.content.$t;
        }
        else if ("summary" in entry) {
            var postContent = entry.summary.$t;
        }
        else var postContent = "";
        var re = /<\S[^>]*>/g;
        postContent = postContent.replace(re, "");
        if (showSummary == true) {
            myDiv = createDiv("bp_item_summary");
                if (postContent.length < summaryLength) {myDiv.appendChild(document.createTextNode(postContent));}
            else {
                postContent = postContent.substring(0, summaryLength);
                var quoteEnd = postContent.lastIndexOf(" ");
                postContent = postContent.substring(0, quoteEnd);
                myDiv.appendChild(document.createTextNode(postContent + '...'));
            }
            main.appendChild(myDiv);
        }
    } //end try
    catch (error) {}
    myDiv =  createDiv("bp_item_meta");
    myDiv.style.clear="both";
    myDiv.style.marginBottom="4px";
    if (showPostDate == true) {
        myDiv.appendChild(document.createTextNode(monthnames[parseInt(cdmonth, 10)] + '-' + cdday + '-' + cdyear));
        flag = 1;
    }
    if (showCommentCount == true) {
        if (flag == 1) {
            myDiv.appendChild(document.createTextNode(" | "));
        }
        if (commentText == '1 Comments') commentText = '1 Comment';
        if (commentText == '0 Comments') commentText = 'No Comments';
        var myLink = createLink(commentUrl,"_top",commentText + " on " + postTitleOriginal)
        myDiv.appendChild(myLink);
        myLink.innerHTML=commentText;
        flag = 1;;
    }
    if (showReadMore == true) {
        if (flag == 1) {
            myDiv.appendChild(document.createTextNode(" | "));
        }
        var myLink = createLink(postUrl,"_top",postTitleOriginal)
        myDiv.appendChild(myLink);
        myLink.innerHTML = readMore+" &raquo;";
        flag = 1;;
    }
    if (flag == 1) main.appendChild(myDiv);
}
if(float_clear==true && imgFloat!="none")
{
myDiv = createDiv("bp_clear_float");
myDiv.style.clear=imgFloat;
main.appendChild(myDiv);
}
document.getElementById("bp_recent_link").style.backgroundImage="url('http://1.bp.blogspot.com/-eel7a5KRsBM/U8uXyyHEjNI/AAAAAAAAIg4/ueZK_YO4rmc/s1600/blogger-widgets.png')";
document.getElementById("bp_recent_link").style.backgroundRepeat="no-repeat";
try{
if(myMargin!=0 && imgFloat=="left" && flag==0) document.getElementById("bp_recent_link").style.marginLeft = myMargin+"px";
} catch(error){}
}
function createDiv(className)
{
var myDiv = document.createElement('div');
myDiv.setAttribute("class", className);
return myDiv;
}
function createLink(href,target,title)
{
var myLink = document.createElement('a');
        if(href.substring(href.length-13,href.length)=="#comment-form") {href= href.substring(0,href.length-13)+"?utm_source=bp_recent&utm-medium=gadget&utm_campaign=bp_recent"+"#comment-form";myLink.setAttribute("href", href);}
        else myLink.setAttribute("href", href+"?utm_source=BP_recent&utm-medium=gadget&utm_campaign=bp_recent");
        myLink.setAttribute("target", target);
        myLink.setAttribute("title", title);
        return myLink;
}
</script>
<script style='text/javascript'>
 var numberOfPosts = 5;
 var showPostDate = false;
 var showSummary = false;
 var titleLength = 0;
 var showCommentCount = false;
 var showThumbs = true;
 var showNoImage = true;
 var imgDim = 125;
 var imgFloat = 'left';
 var myMargin = 5;
 var mediaThumbsOnly = true;
 var showReadMore = false;
</script>
<script src='http://www.crounji.org/feeds/posts/default/-/Featured?max-results=5&amp;orderby=published&amp;alt=json-in-script&amp;callback=bprecentpostswiththumbnails'>
</script></div></center>

5. Make these changes
Change your blog feed URL and Label at the bottom of the code.So the feed must look as below
<script src='http://www.yourblogurl.org/feeds/posts/default/-/yourlabel?max-results=5&amp;orderby=published&amp;alt=json-in-script&amp;callback=bprecentpostswiththumbnails'>
</script>
</div></center>
6. You can use a label Featured or as your wish.

7. To change no or posts change
var numberOfPosts = 5;
and 
<script src='http://www.yourblogurl.org/feeds/posts/default/-/yourlabel?max-results=5&amp;orderby=published&amp;alt=json-in-script&amp;callback=bprecentpostswiththumbnails'>
</script>
</div></center>
8. To change thumbnail image size change
var imgDim = 125;

9. Now press save button on HTML/JavaScript window.

Please share and commants your experience

Valga valamudan

14 July 2014

How to recover your bricked Lumia device with Nokia Recovery Software Tool

Have a Lumia handset that is bricked or not turning on? You can send it for repair. Or you could try the DIY approach and fix it yourself with the help of Nokia Recovery Software Tool. It is a desktop application that is programmed for recovering your sickly Lumia back up and running. Here's a speedy exercise on the most proficient method to utilize the product.


Download the Nokia Software Recovery tool


PC Requirements to run Nokia Software Recovery tool

  • Windows 7 or newer
  • USB cable to connect phone and computer
  • Minimum 4 GB free storage space

How to recover, restore your bricked Lumia device with Nokia Recovery Software Tool

How to recover bricked Lumia with Nokia Software Recovery Tool

  1. Download and install Nokia Software Recovery Tool by on screen instructions.
  2. Open Nokia Software Recovery Tool on your PC.
  3. Connect Lumia to PC by a USB cable
  4. You will see the software version to install on your Lumia device with details - Hit Install button.
  5. You will need to recognize that the information and content on your Lumia device will be erased. In case if you can access your phone create a backup by going into settings > backup. You should know that that photographs, music and apps will be wiped during this reset process. Click that you understood and then click continue.
  6. It will now start downloading the software. It will take few minutes to complete.
  7. Now the software will install on your phone. Don't utilize your phone or disconnect the USB cable during installation. Wait for few minutes. Your phone is getting ready.

That's all you're done. You have saved your phone.

Note: This Nokia Software recovery tool will support only on Lumia range of devices Will not support other makes like Micromax, HTC, Samsung...
Nokia Software Recovery Tool may erace all the personal datas from your phone. If possible create a backup your personal contents before starting the procedure.

Please share your experience with Nokia Recovery Software tool in the comment section.

Enjoy, Valga valamudan

11 July 2014

How to find Windows 8 Product Key embedded in BIOS

Microsoft has done major changes in Windows 8. For the laptops and computers shipped with factory pre-installed windows 8 or 8.1. On installing Windows 8 or 8.1 it will use the windows key embedded in bios and activates automatically. Also you can not find the windows key on windows sticker also.

How to find the product key on a preinstalled version of Windows 8

1. Right click on windows logo in bottom left corner of the screen and select Command prompt.

2. Copy and paste the below code on the command prompt and press enter.

powershell "(Get-WmiObject -query ‘select * from SoftwareLicensingService’).OA3xOriginalProductKey"

Note down your Windows 8 product key.


If you are a Windows 8 Single Language (Windows 8 SL) user. If you install a fresh Windows 8 this key may not help during installation. Just copy some default Windows 8 product key from web and proceed the installation. During the activation enter your Windows 8 key and activate online.

Share this post with your friends and family.


Valga Valamudan
Get every new post delivered to your Inbox.


Copyright © 2014 Crounji. All rights reserved.

Back to Top